
The Bottom Line
Introduction, Specifications, Pricing & Availability
You've all heard about it. Direct to CPU RAID that is bootable. Direct to CPU RAID can deliver the full throughput potential of your storage array because it is not done through the limited bandwidth of your motherboard's chipset like we've seen to this point. Direct to CPU RAID uses a 16-lane PCIe slot that is routed directly to your CPU. Same slot as a x16 graphics card uses. There is a caveat to this though. Both Intel and AMD platforms must be capable of bifurcating 16 lanes into four separate 4-lane channels. This currently limits the use of Direct to CPU RAID for the consumer to Intel X299 and AMD X399 platforms. Not all X299 and X399 motherboards can bifurcate a 16x PCIe slot so you need to verify before proceeding. Additionally, you can use more than one Direct to CPU Quad Card if you wish to RAID more than one Quad Card into a single RAID volume. RAIDing Quad Cards is of course dependent on your motherboards capability to bifurcate more than one 16x PCIe slot.
ASRock's Quad Card is the newest Direct to CPU AIC (Add-In-Card) card on the market. It is heavily refined and sports unique angled M.2 Gen3x4 slots. Angling the M.2 slots is advantageous because the angle keeps the slot traces as close to the card's 16x edge connector as possible which should, in theory, reduce communication latency. Another unique feature of ASRock's Quad Card is that it has a built-in 6-pin 12V PCIe power connector for SSD arrays that demand more power than the 25 Watts that is native to a 16x PCIe slot. Most of the time you will not need the additional power, but if you are using U.2 SSDs with M.2 adapters, then you will defiantly need the extra power. ASRock feels their Direct to CPU Quad Card is a superior product for the following reasons:

Okay, we're convinced that ASRock's Quad Card is leading-edge technology and probably the best design on the market right now. For our testing, we chose to use four Intel 760p 512GB SSDs. We chose the 760p because using Intel SSDs means you won't need a VROC key to create a RAID 0 array on X299, and because the 760p is VROC compatible. Intel's 760p isn't the fastest SSD we could have chosen, but it does have excellent sequential read performance. Read our Intel 760p 512GB M.2 NVMe Review HERE.
Now if you are using the ASRock Quad Card with AMD X399, your choice of M.2 NVMe SSD doesn't matter because a key is not required for any type of RAIDXpert array. Let's get into the review. In the first section of our review we will be presenting Intel VROC performance results using Intel's X299 platform with ASRock's Quad Card. In the second section of our review, we will be presenting AMD RAIDXpert performance results using AMD's X399 platform with ASRock's Quad Card. We will show you step-by-step how to setup bootable and secondary arrays on both platforms and benchmarks for both system disk and secondary volumes.
MSRP ASRock Ultra Quad M.2 Card: $79.99. Availability: Early 2018
Details
ASRock Ultra Quad M.2 Card
The Ultra Quad M.2 Card is packaged in a Silver and Black themed flip-top box. Best color combination ever. Much better than say... Red and Yellow.
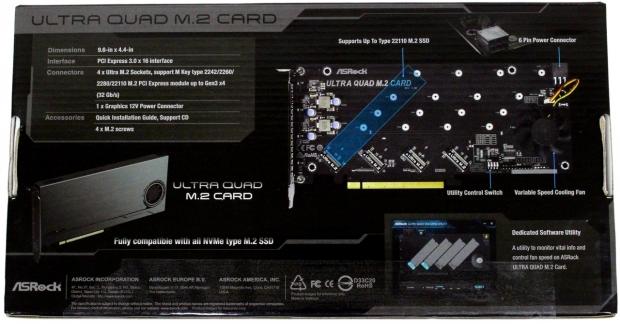
This underside of the packaging advertises some features of the Ultra Quad M.2 Card.
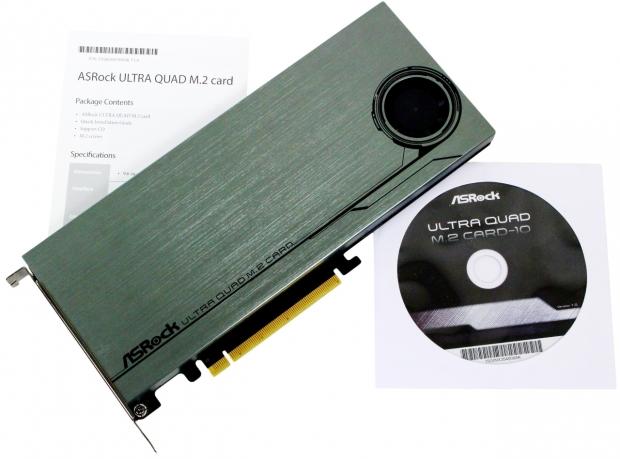
The Ultra Quad M.2 Card ships with a printed installation guide and monitoring software.
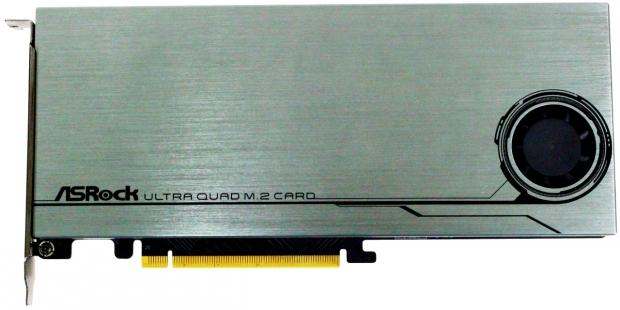
The cover of the Ultra Quad M.2 Card is formed from thick brushed sheet aluminum.
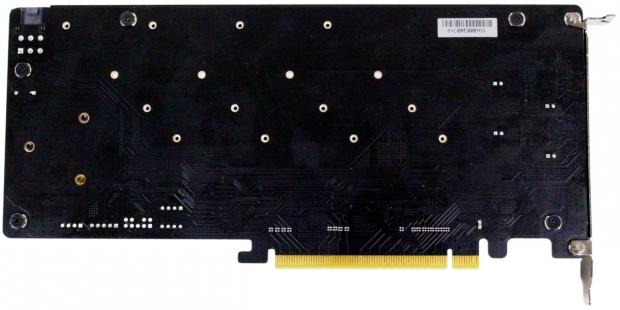
The back of the Card is its PCB. There are no components on this side of the PCB.
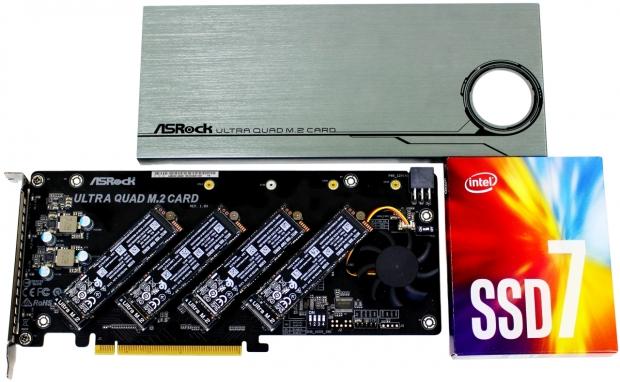
Removing the cover of the Ultra Quad M.2 card gives you access to mount your M.2 SSDs. The cover is attached with five screws.
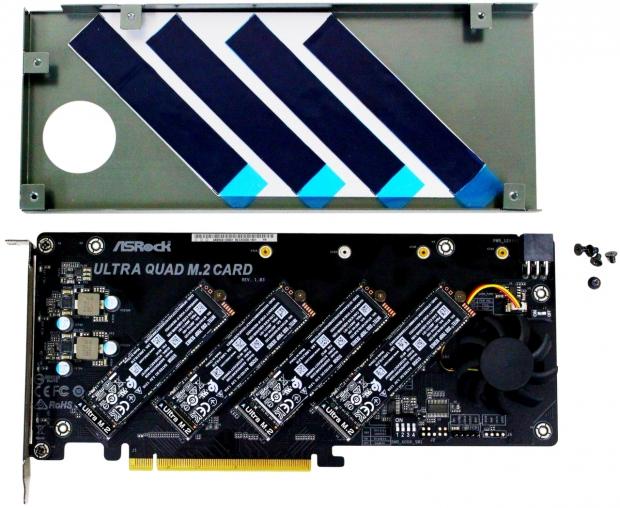
The underside of the cover features a thick aluminum heat sink with four thermal pads that are exposed when you peel off the protective plastic strips.
X299 Test System Setup
Jon's X299 SSD Review Test System Specifications
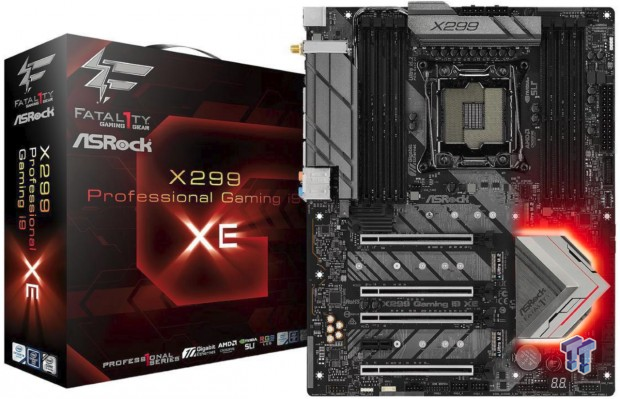
ASRock's X299 Professional Gaming i9 XE is an awesome performer. One of the best X299 motherboards on the market. Read our Review HERE
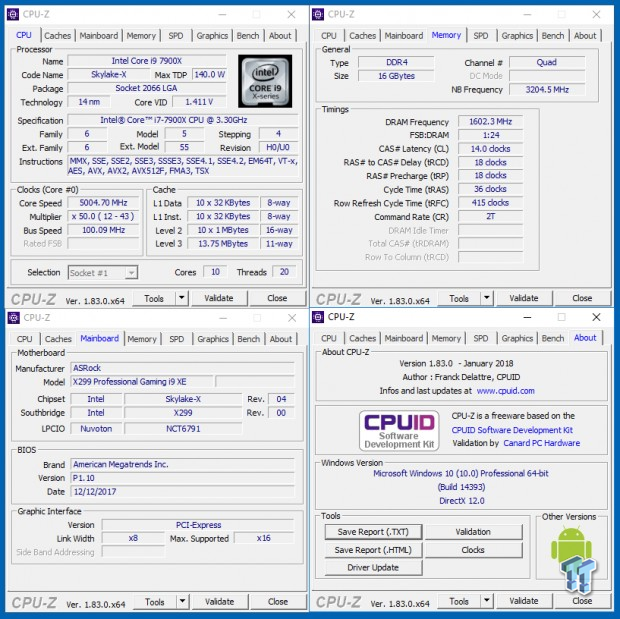
We had no problem overclocking our delidded Intel Core i9 7900X 20 thread CPU to 5GHz on all 20 threads with a mesh of 32x. This setup is XTU stable and does not throttle under 100% load with AIO water cooling.
Bootable Intel VROC RAID 0 Array Setup
Creating a bootable VROC RAID Array
Before proceeding head to your motherboard manufacturer's download section and grab the latest RSTe 5.XXX Series SATA Floppy Image and extract it. Place it on a USB drive.
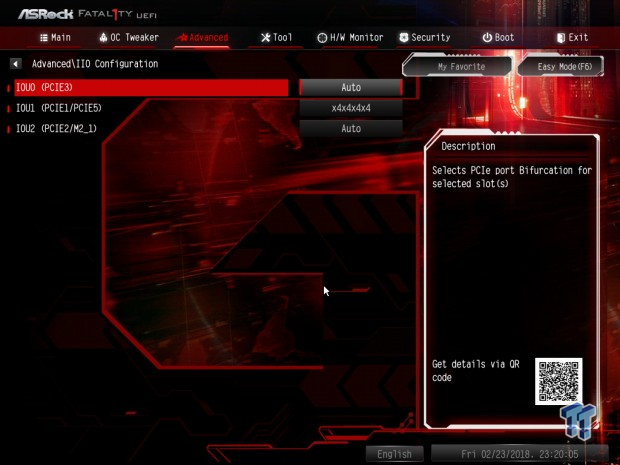
Step one in creating a bootable VROC array is set storage to boot UEFI only. Next, you need to bifurcate a 16x slot to x4x4x4x4. We chose PCIe slot 1.
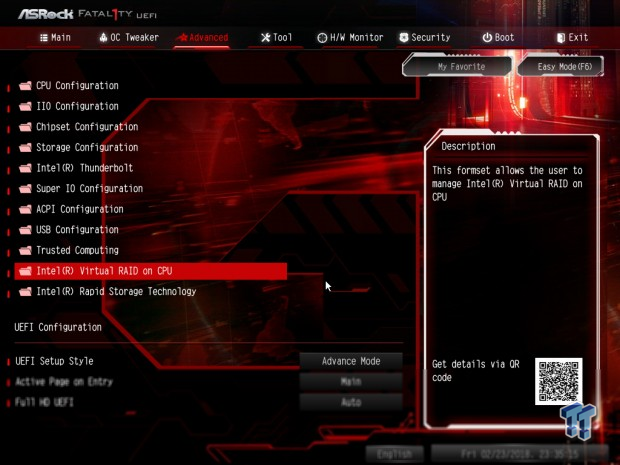
Next, create your RAID volume by entering Intel Virtual RAID on CPU. This is found on the Advanced tab of our BIOS.
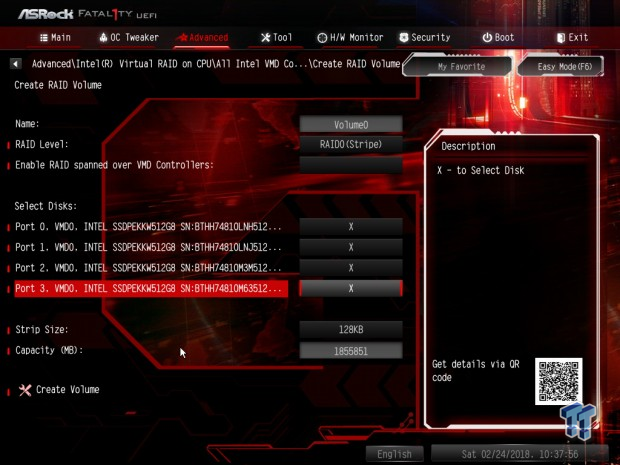
Click on Create RAID Volume. Select RAID 0. Select your drives for the array. Stripe size is a default of 128KB, stay with that it runs best. Click create volume.
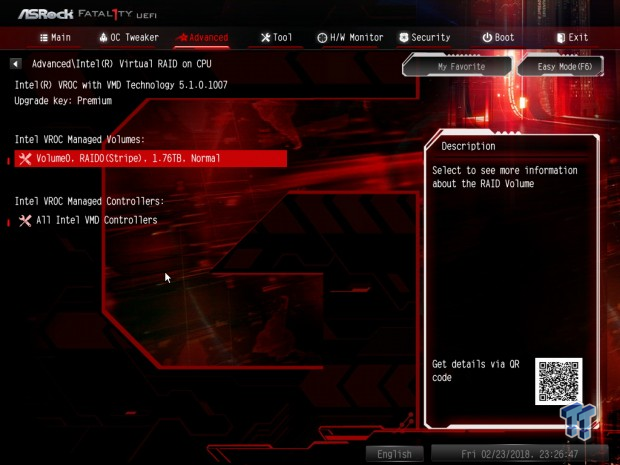
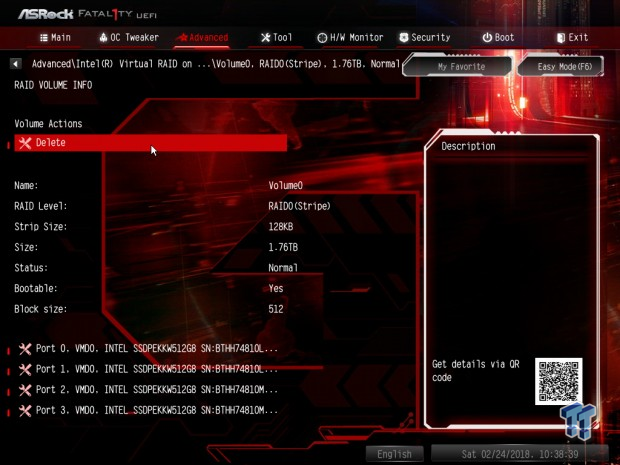
Now you have created your RAID volume. Insert your Windows Installer USB, the USB drive with the RSTe 5.XXX Series SATA Floppy Image driver on it and reboot.
Be sure you are booting your Windows Installer as UEFI when installing Windows.
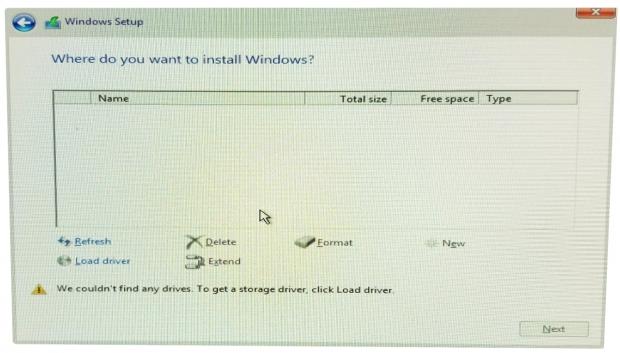
Once you have the installer to where you select where to install Windows, you will be greeted with no drives in the list. Click on Load Driver. (This is where we inject the driver you downloaded so the array can be seen.) Now click on Browse.
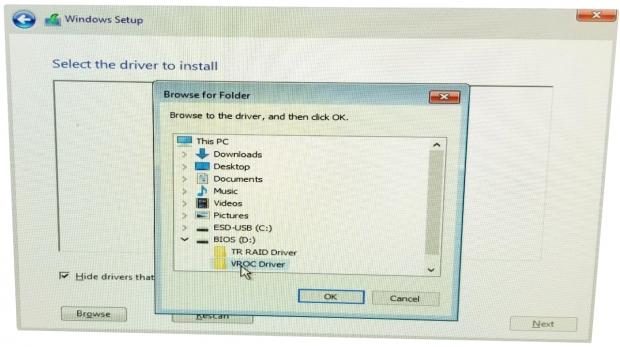
Browse to the folder with the RSTe 5.XXX Series SATA Floppy Image driver you placed on the separate USB drive, and click OK.
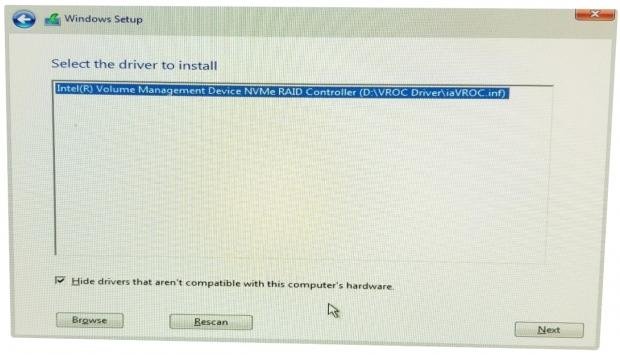
Select the VROC driver and click Next to inject the driver into your Windows install.
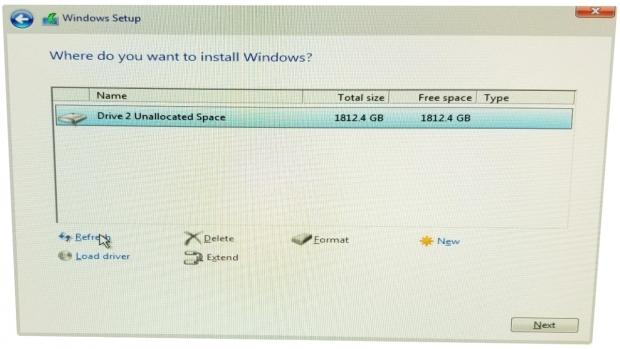
After the driver is injected hit refresh. Windows Installer can now see the array and away you go.
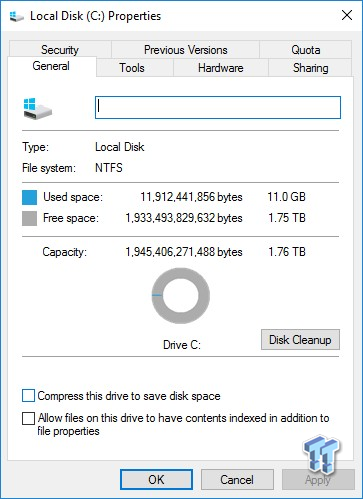
After Windows installs, install your chipset drivers and then you need to install the RSTe control panel/driver to be able to manage the array. Go back to the driver downloads for your motherboard and grab Intel Rapid Storage Technology enterprise driver and utility. Install it.
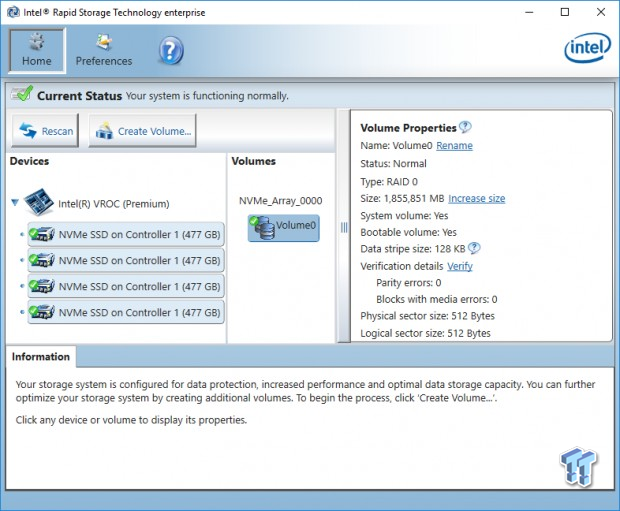
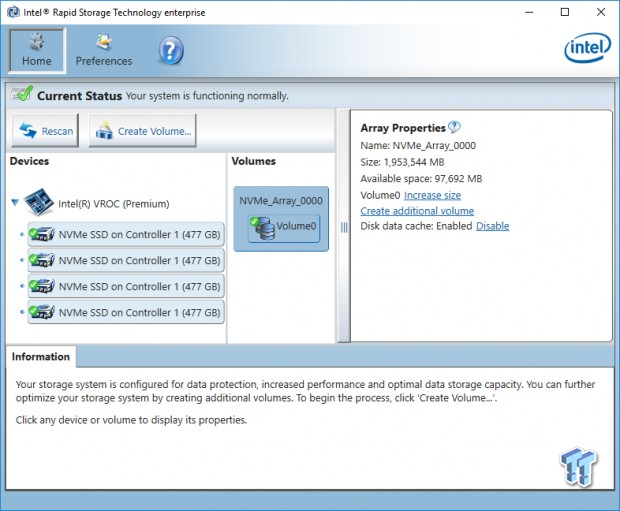
Open the RSTe control panel. Here you can see the configuration of your VROC array. Make sure Disk data cache is enabled.
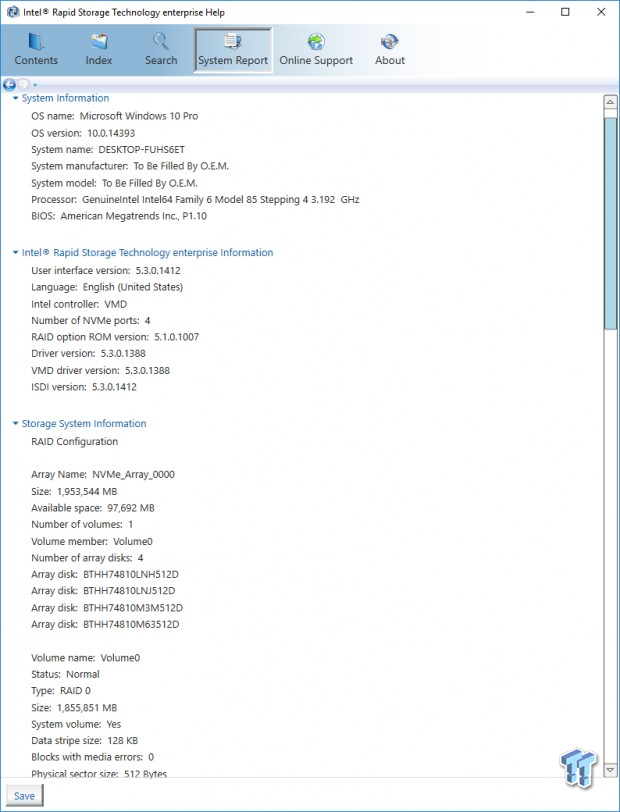
This is a quick shot of our system and array as we configured it. You can see the drivers we used and the settings we chose.
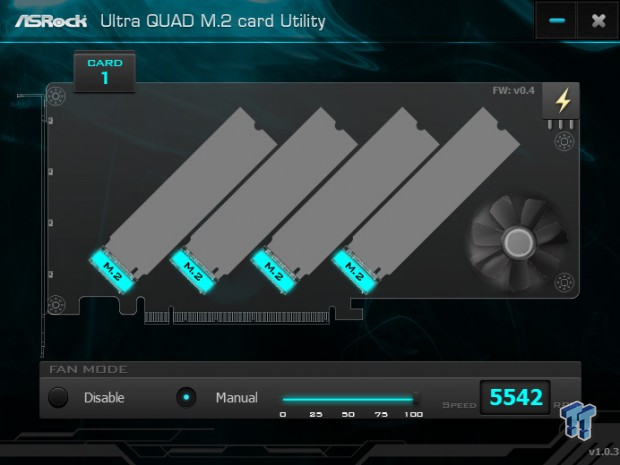
You can install ASRock's Ultra Quad M.2 Card Utility if you want to manage the card's fan speed.
Benchmarks VROC System Disk
ATTO
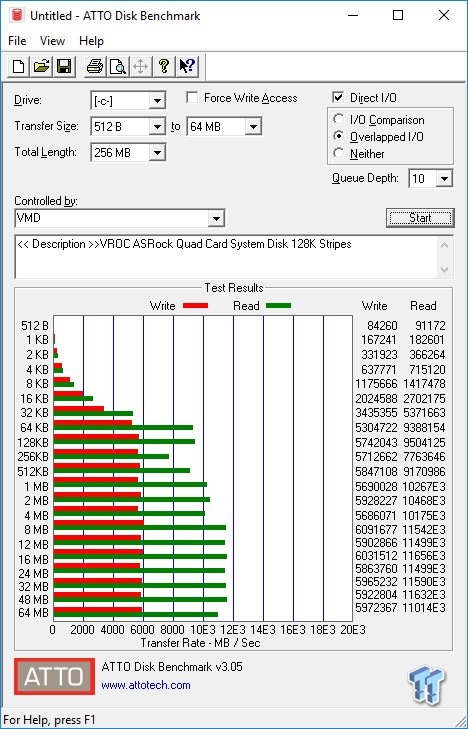
With ATTO running at QD10, we hit a max of 11.6GB/s sequential read and 6GB/s sequential write.
Anvil Storage Utilities
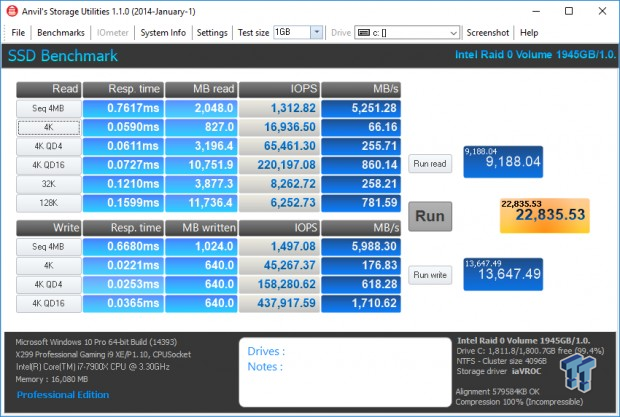
Running Anvil's produces an impressive total score of 22,835.53.
CrystalDiskMark
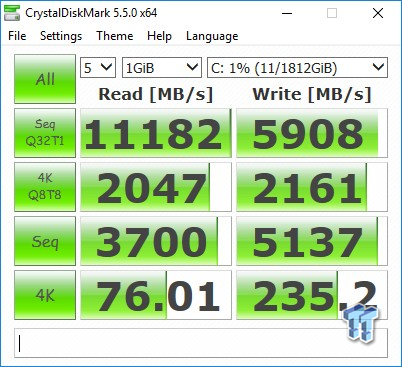
With CrystalDiskMark, we hit 11.1 GB/s sequential read at Q32T1 and 5.9GB/s sequential write with the same setting.
AS SSD
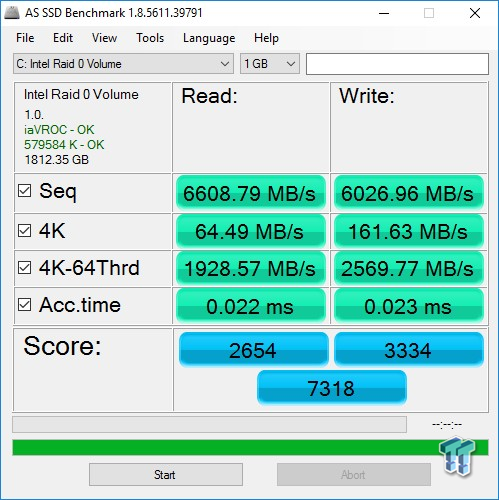
Running AS SSD benchmark produces an impressive total score of 7,318. We hit 6.6GB/s sequential read and 6GB/s sequential write.
Now let's move on and see what running our VROC array as a secondary volume produces. The results should be better in most cases without the overhead of an OS installed on the array.
Secondary Volume Intel VROC RAID 0 Array Setup
Creating a secondary VROC RAID 0 Array
For this you only need to be sure your PCIe 16x slot with the Ultra Quad M.2 Card is set to x4x4x4x4 in the BIOS, and that you have installed the latest Intel Rapid Storage Technology enterprise driver and utility.
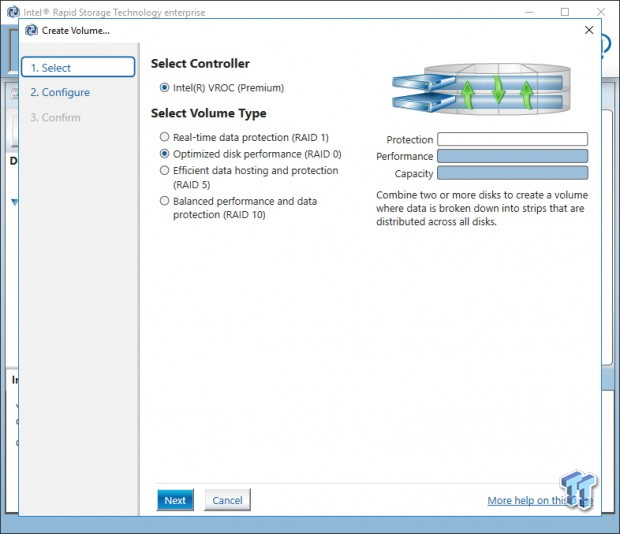
Open the Intel RSTe control panel and click on Create Volume. Select Optimized disk performance (RAID 0). Hit Next.
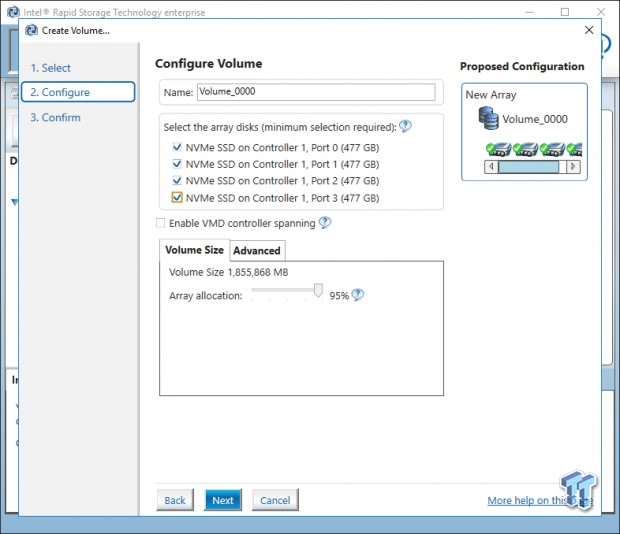
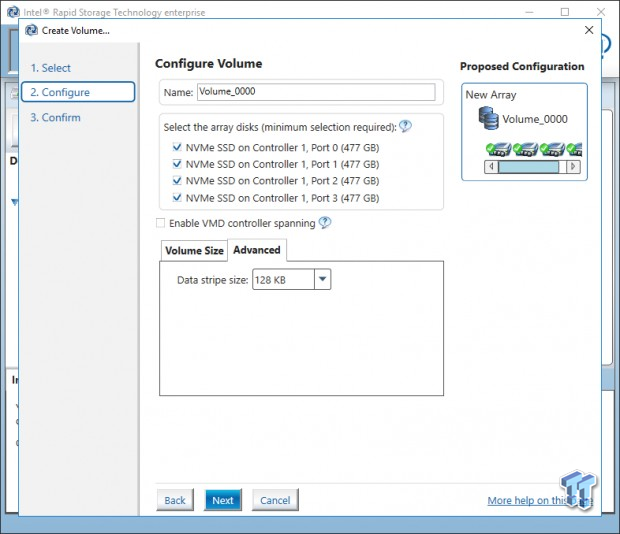
Select your Disks. Click on Advanced and select your desired stripe size. 128 KB works best. Hit Next.
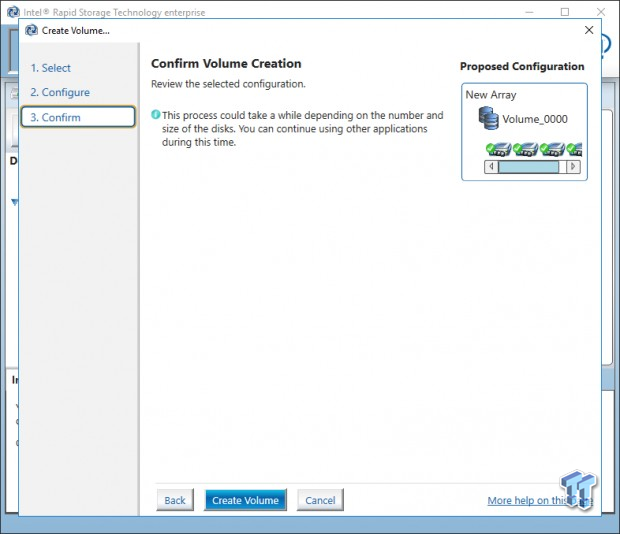
Click Create Volume.
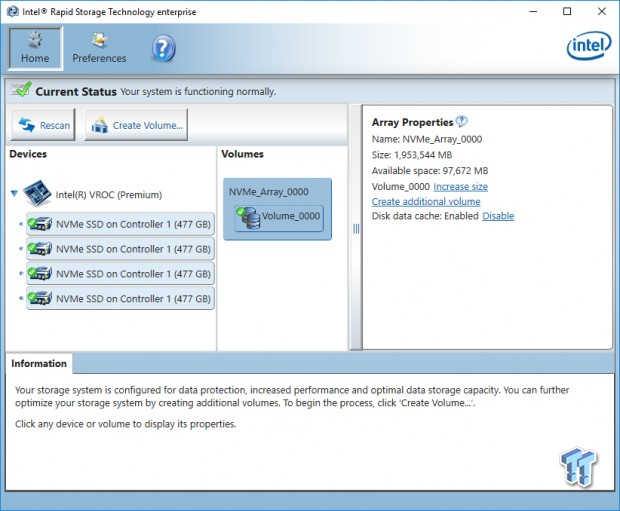
Done. Volume is created. Verify that Disk data cache is enabled. Now go to Windows Disk Management, initialize as GPT and create a partition.
Benchmarks VROC Secondary Volume
ATTO
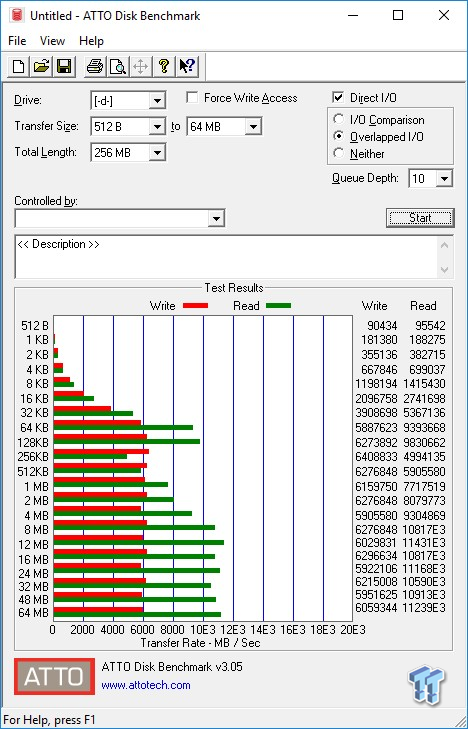
With ATTO running at QD10, we hit a max of 11.4GB/s sequential read and 6.4GB/s sequential write. Compared with our VROC array running as a system disk, sequential write shows significant improvement, while sequential read shows a slight decrease.
Anvil Storage Utilities
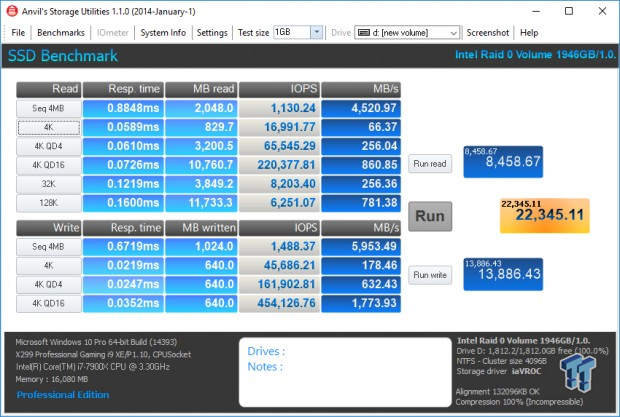
Running Anvil's produces an impressive total score of 22,345.11. This is slightly lower than we got with our VROC array running as a system disk.
CrystalDiskMark
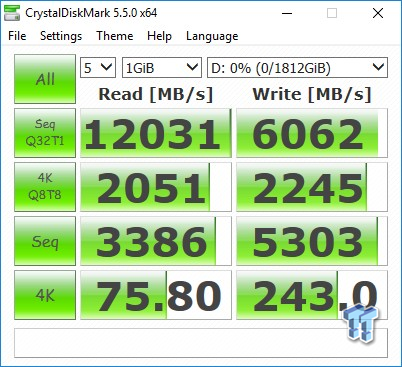
With CrystalDiskMark, we hit 12GB/s sequential read at Q32T1 and 6GB/s sequential write with the same setting. Overall, significantly better results than with our VROC array running as a system disk.
AS SSD
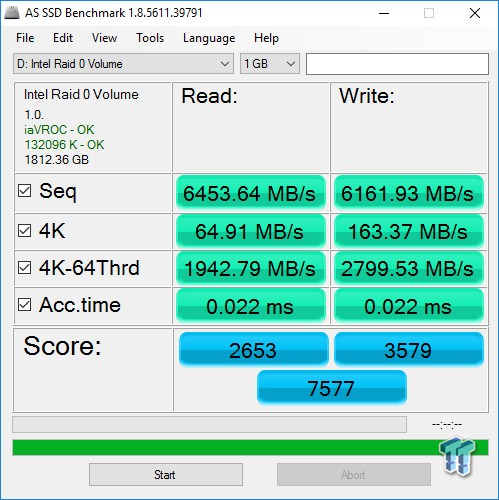
Running AS SSD benchmark produces an impressive total score of 7,577. We hit 6.4GB/s sequential read and 6.1GB/s sequential write. Overall, better results than with our VROC array running as a system disk.
Iometer Sequential Read/Write QD32
(No partition on the array)
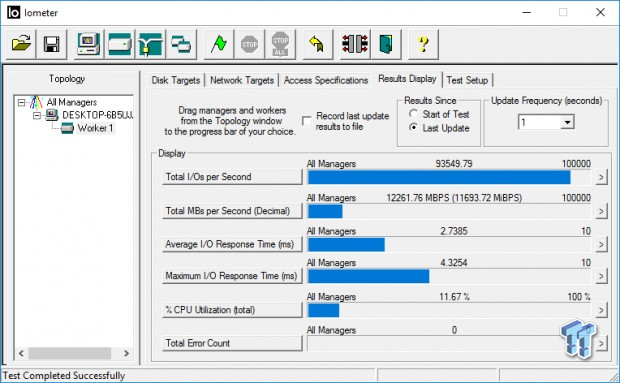
We hit 12.2GB/s sequential read with Iometer.
(No partition on the array)
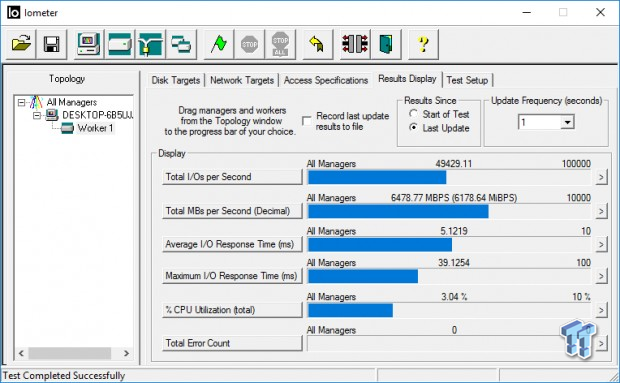
We hit 6.4GB/s sequential write with Iometer.
Iometer Max 4K IOPS Read/Write QD256
(No partition on the array)
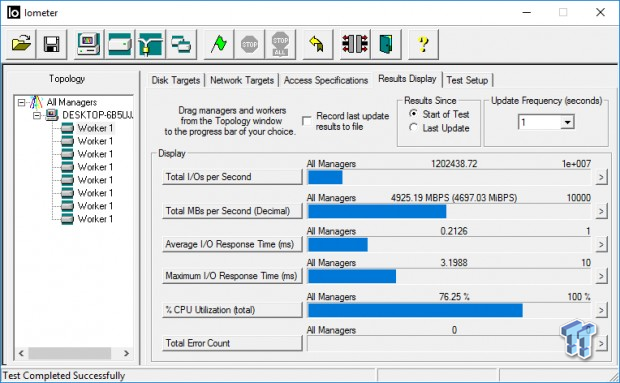
We hit a very impressive 1.2 Million 4K Random Read IOPS with Iometer.
(No partition on the array)
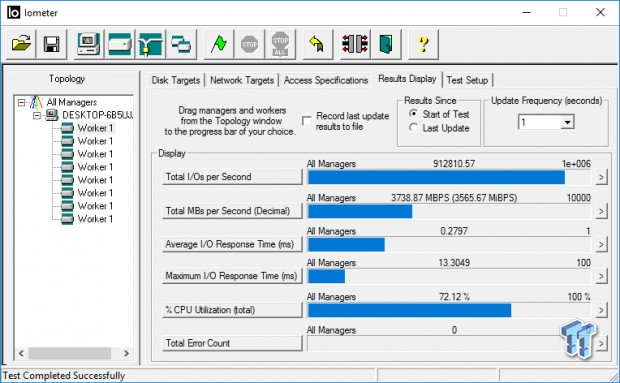
We hit an equally impressive 900K 4K Random Write IOPS with Iometer.
Overall, impressive results from our Intel system as served up by ASRock's Ultra Quad M.2 Card. Now, let's move on to our Threadripper platform and see what it can do with the Ultra Quad M.2 Card.
X399 Test System Setup
Jon's X399 SSD Review Test System Specifications
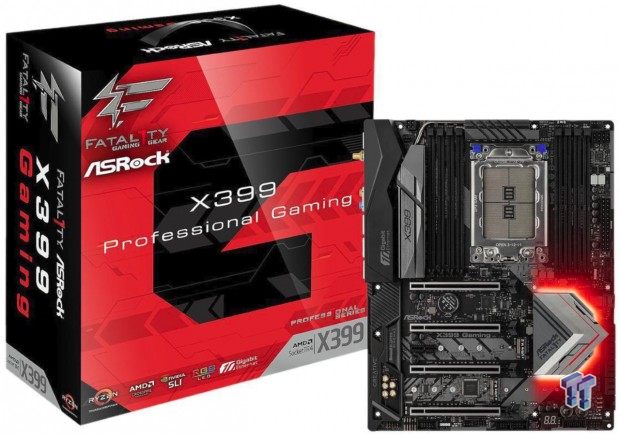
ASRock's Threadripper X399 Professional Gaming Motherboard is at the top of the food chain. It is full of the very best components. Read our Review HERE
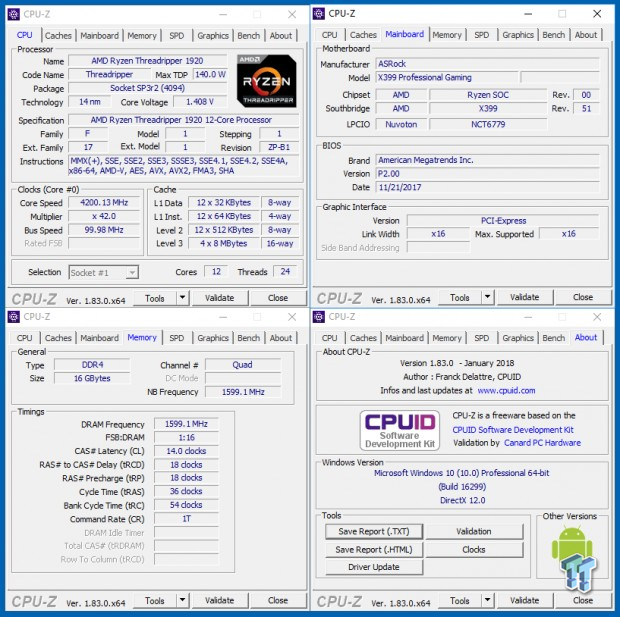
We had no problem overclocking our TR 1920 24 thread CPU to 4.2GHz on all 24 threads. This setup is Intel Burn Test stable and does not throttle under load with AIO water cooling.
Bootable AMD RAIDXpert RAID 0 Array Setup
Creating a bootable RAIDXpert RAID 0 Array
Before proceeding head to your motherboard manufacturer's download section and grab the latest AMD RAID driver ver:9.00.00.088 SATA Floppy Image and extract it. Place it on a USB drive.
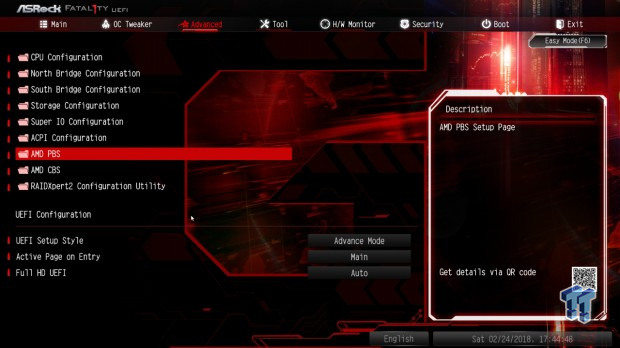
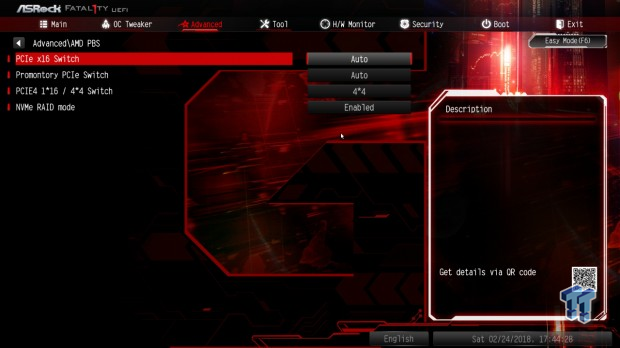
Step one in creating a bootable RAIDXpert NVMe array is set storage to boot UEFI only. Next, you need to bifurcate a 16x slot to 4x4. You also need to enable NVMe RAID Mode.
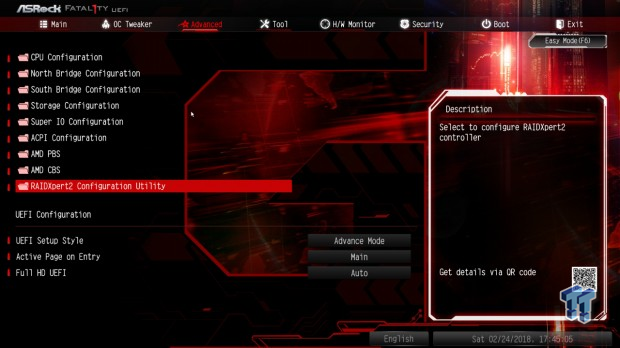
Next, create your RAID volume by entering RAIDXpert2 Configuration Utility. This is found on the Advanced tab of our BIOS.
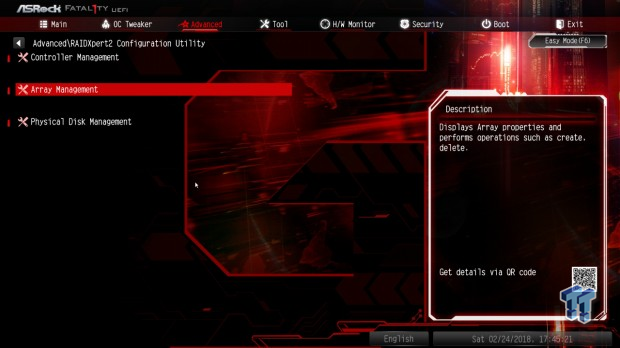
Click on Array Management.
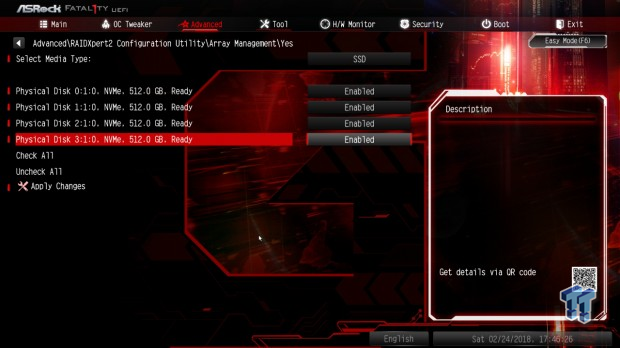
Select media type to SSD. Enable the drives and apply changes.
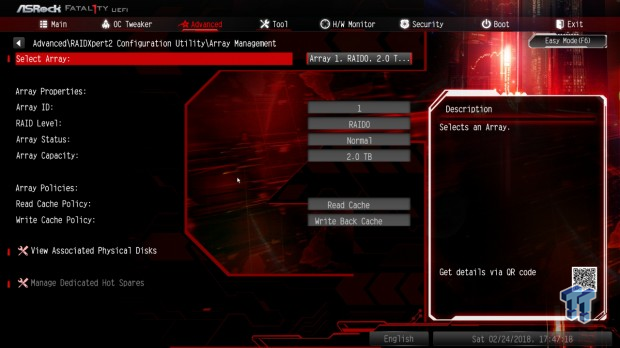
Now you have created your RAID volume. Insert your Windows Installer USB, the USB drive with the AMD RAID driver ver:9.00.00.088 SATA Floppy Image driver on it and reboot.
Be sure you are booting your Windows Installer as UEFI when installing Windows.
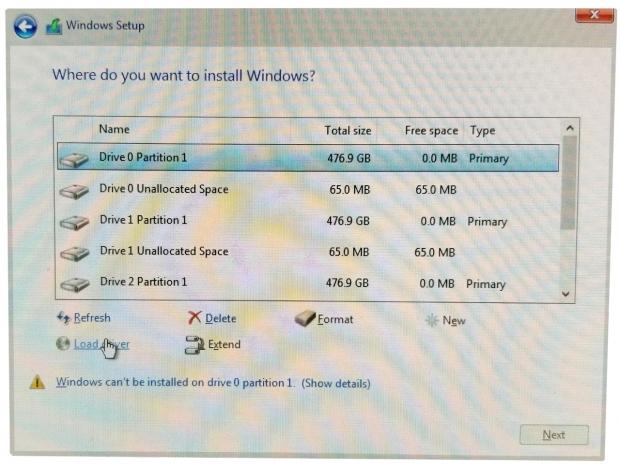
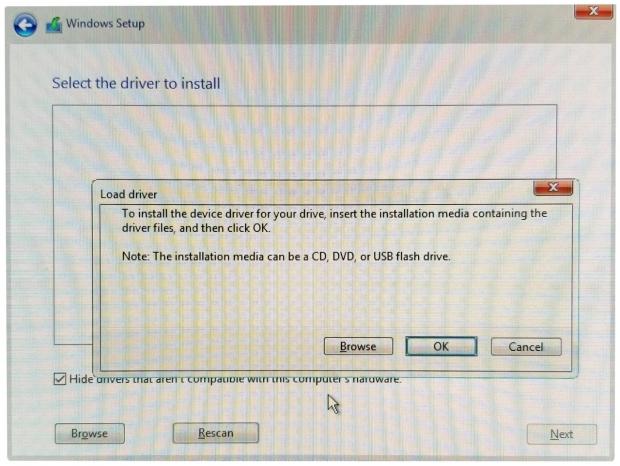
Once you have the installer to where you select where to install Windows, you will be greeted with partitions that Windows cannot be installed on. Click on Load Driver. (This is where we inject the driver you downloaded so the drives can be seen as an array.) Now click on Browse.
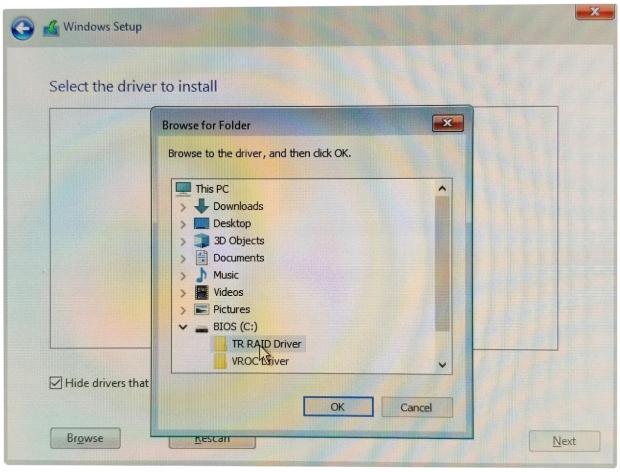
Browse to the folder with the AMD RAID driver ver:9.00.00.088 SATA Floppy Image driver you placed on the separate USB drive, and click OK.
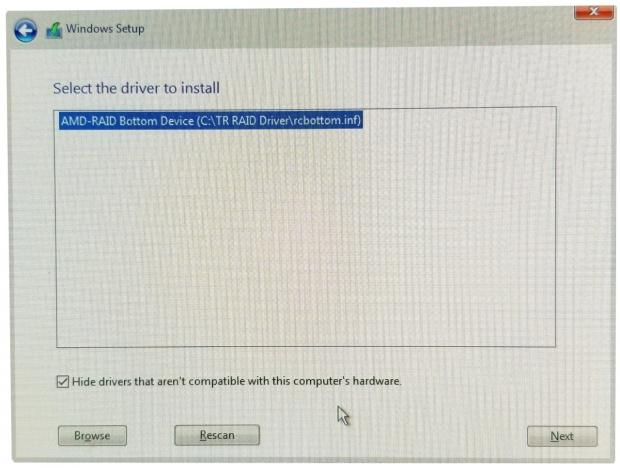
Select the AMD-RAID Bottom Device driver and click Next to inject the driver into your Windows install.
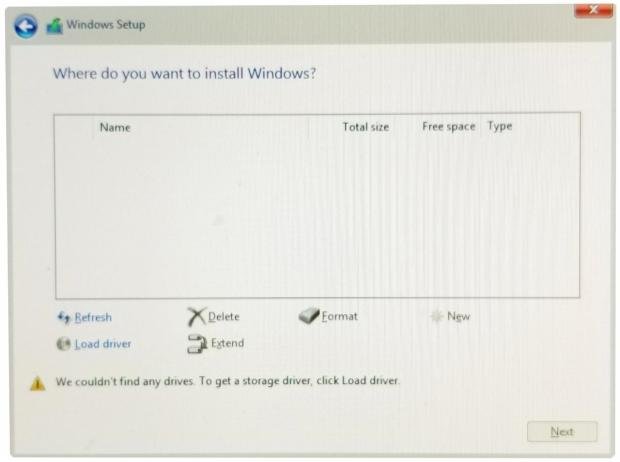
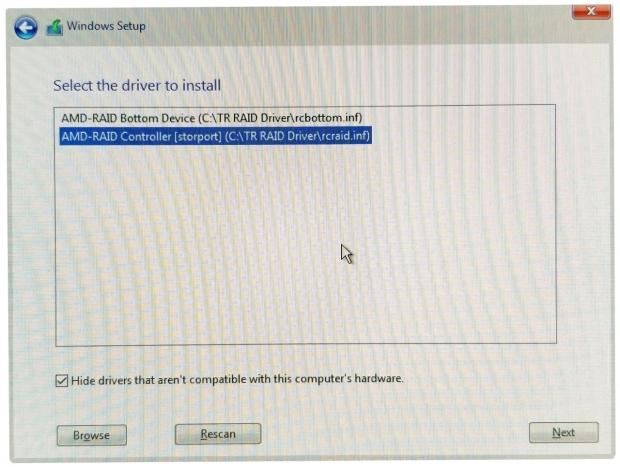
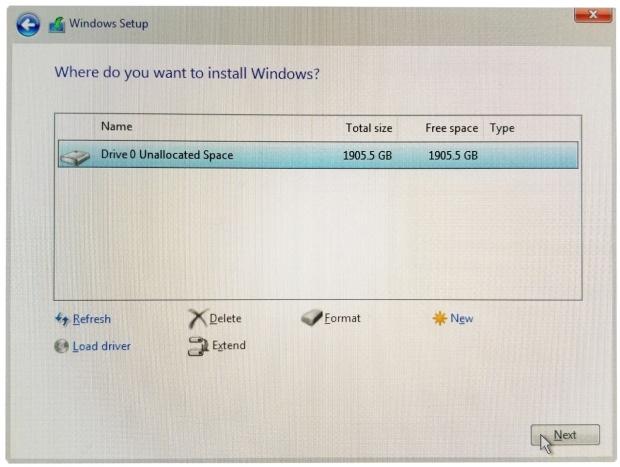
Now nothing shows up, but do not worry another driver needs to be injected. Click on Load Driver again, and another driver shows up. Select the AMD-RAID Controller driver and hit Next. After the second driver is injected, your unallocated array shows up.
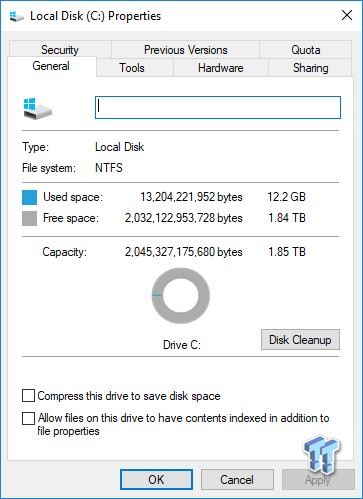
After Windows installs, install your chipset drivers and then you need to install the AMD-RAID Configuration SCSI Processor Device. Copy the folder from your AMD RAID driver ver:9.00.00.088 SATA Floppy Image driver you placed on the separate USB drive to your desktop.
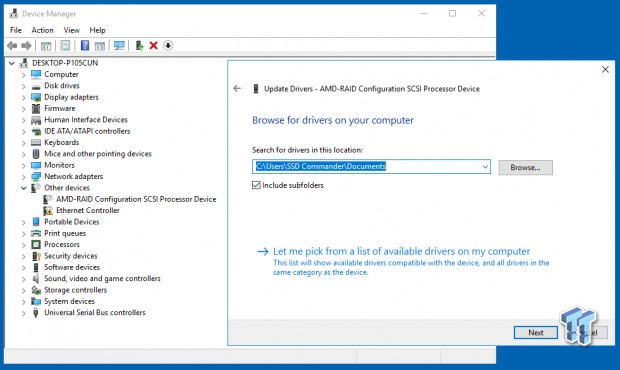
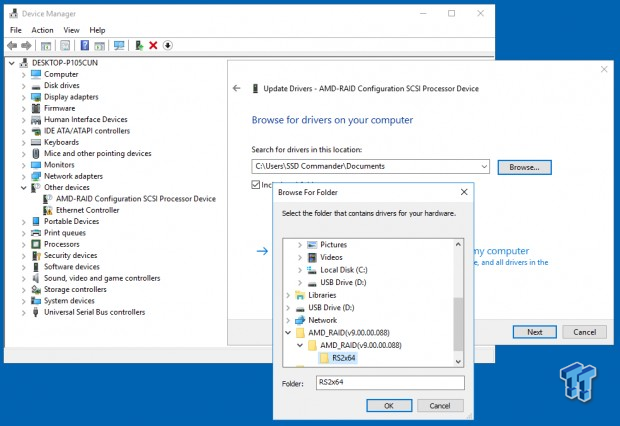
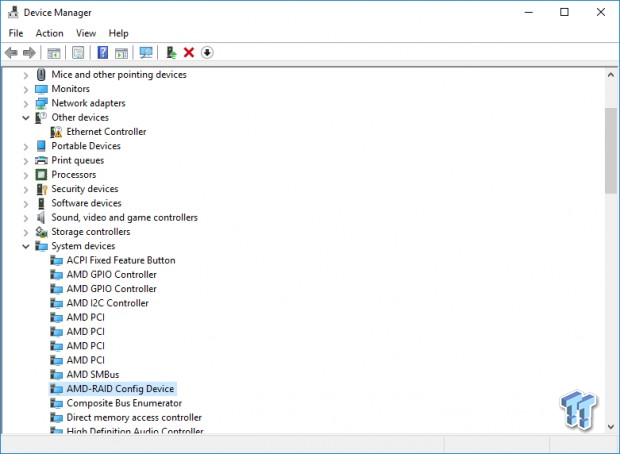
Open device manager and you will see AMD-RAID Configuration SCSI Processor Device with a question mark. Right-click on it and select update driver. Click browse and browse to the driver folder you placed on your desktop. Select the RS2x64 folder and hit OK. The driver will load, and your AMD-RAID Config device will be installed. It can be found under system devices. Now we can install AMD RAIDXpert2 utility ver:9.0.0.88 which is again found on your motherboard driver download page.
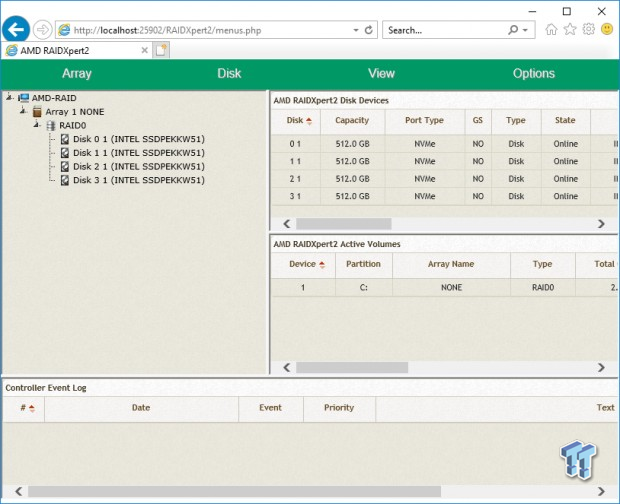
After the Utility is installed and you have logged in, you are greeted with the AMD RAIDXpert2 management interface. We don't need to do anything in here when our Direct to CPU array is drive C. The utility is necessary to create a secondary volume though.
Now let's see what performance looks like.
Benchmarks AMD RAIDXpert System Disk
ATTO
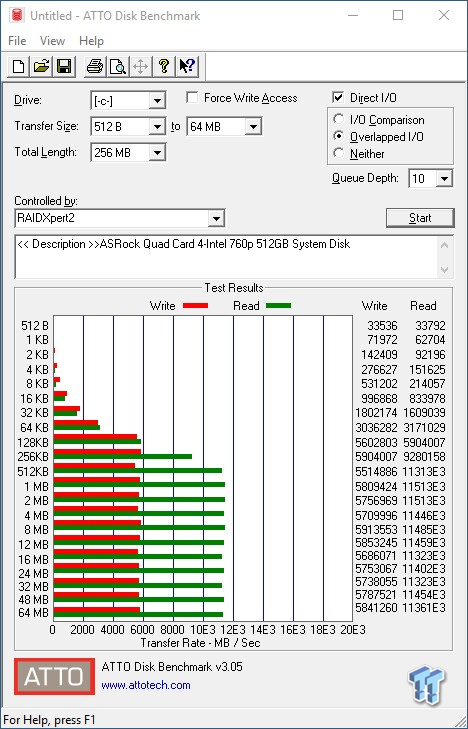
With ATTO running at QD10, we hit an impressive max of 11.4GB/s sequential read and 5.9GB/s sequential write.
Anvil Storage Utilities
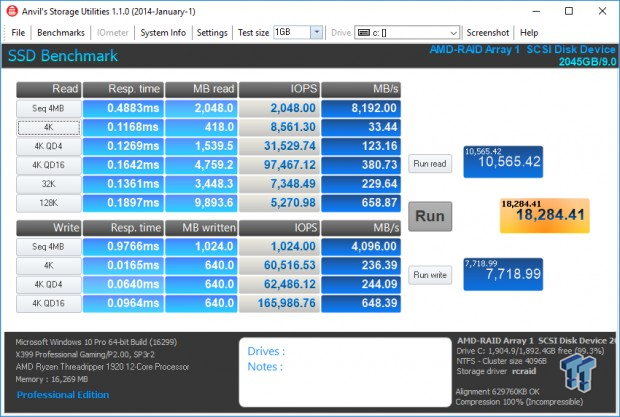
Running Anvil's produces, a less than impressive total score of 18,284.41. Here we begin to see that AMD Direct to CPU RAID offers nothing but sequential performance. That's all there is. Random performance, which is far more important than sequential for a system disk, is less than that of one SSD. Very disappointing.
CrystalDiskMark
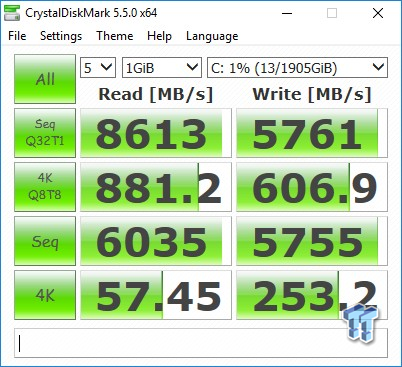
With CrystalDiskMark, we hit 8.6 GB/s sequential read at Q32T1 and 5.7GB/s sequential write with the same setting. Again, we see that other than 4K QD1 random write, all other random performance is garbage. This is not a bad reflection on the Ultra Quad M.2 Card or ASRock in anyway, this is just proof positive of AMD's incompetence when it comes to RAID of any flavor. Remember seeing 27GB/s sequential read from Threadripper with dual quad cards on YouTube? Everybody is wowed, but what they failed to mention is that while they can hit 27GB/s sequential read, that same array delivers real-world performance that is less than that of one NVMe SSD running on Windows 10 crappy in-box NVMe driver. Maybe random performance could be better if you could pick your stripe size in RAIDXpert, but of course, you cannot.
AS SSD
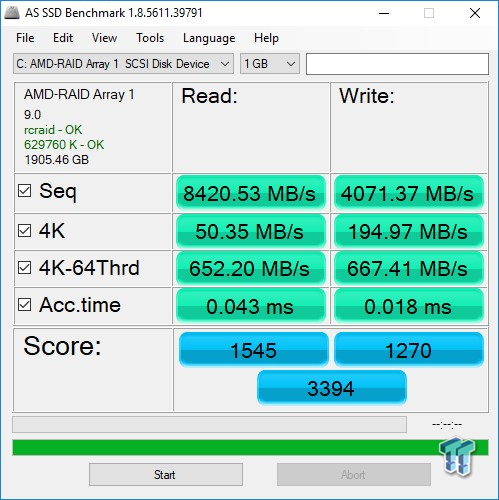
Running AS SSD benchmark produces a very unimpressive total score of 3,394. We hit 8.4GB/s sequential read and 4GB/s sequential write, but who cares when random performance is this bad.
Now let's move on and see what running our Direct to CPU RAIDXpert array as a secondary volume produces. The results should be better in most cases without the overhead of an OS installed on the array.
Secondary Volume AMD RAIDXpert RAID 0 Array Setup
Creating a secondary RAIDXpert RAID 0 Array
For this you only need to be sure your PCIe 16x slot with the Ultra Quad M.2 Card is set to 4x4 in the BIOS, NVMe RAID is enabled and that you have installed the latest AMD RAIDXpert drivers and utility.
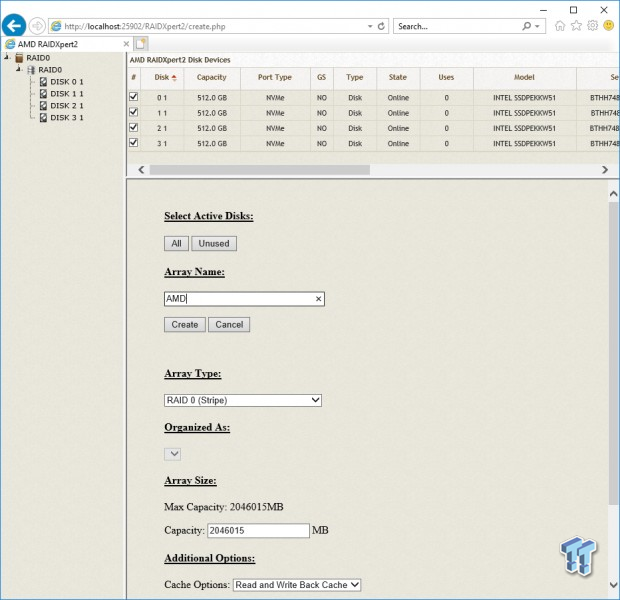
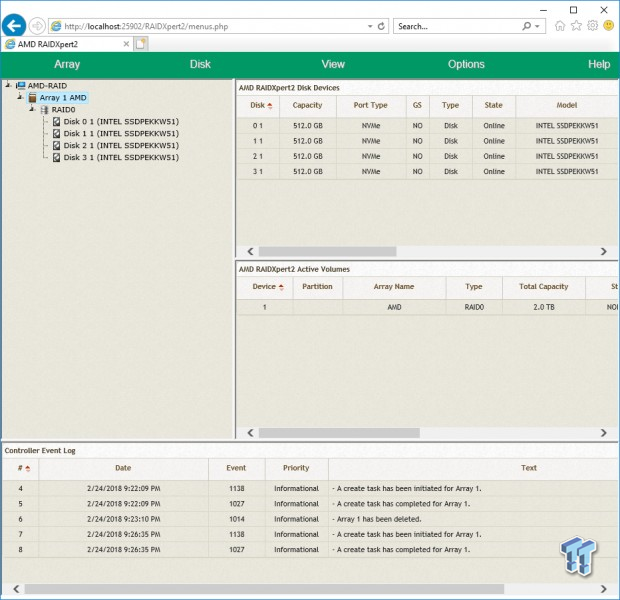
Login to the RAIDXpert Utility and click on Create Array. Select your disks and click on Create. Done. Volume is created. Now go to Windows Disk Management, initialize as GPT and create a partition.
Benchmarks RAIDXpert Secondary Volume
ATTO
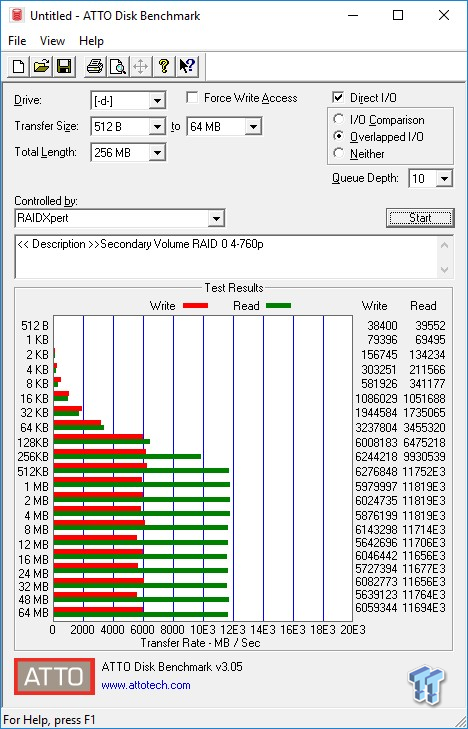
With ATTO running at QD10, we hit a max of 11.8GB/s sequential read and 6.2GB/s sequential write. Compared with our RAIDXpert array running as a system disk, max sequential performance shows significant improvement.
Anvil Storage Utilities
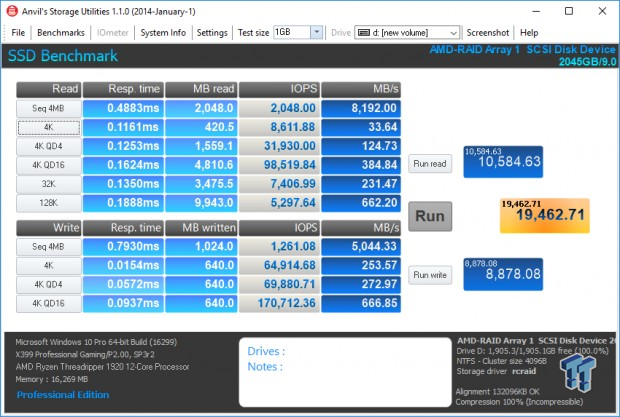
Running Anvil's produces a total score of 19,462.71. The score doesn't look that bad until you realize that most of it is coming from high sequential performance. Here again, a single 760p has far better random performance than we are getting from a four drive "RAIDXpert" managed array.
CrystalDiskMark
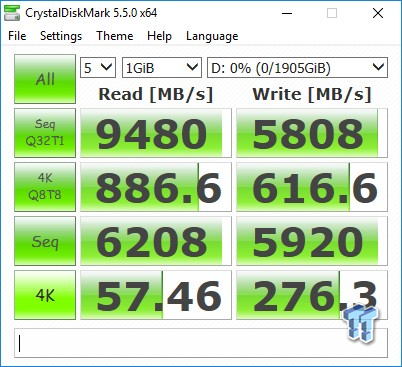
With CrystalDiskMark, we again see good sequential performance especially at QD1 read where it is a lot better than we are getting from our VROC array. But once again, multi-threaded random performance is abysmal.
AS SSD
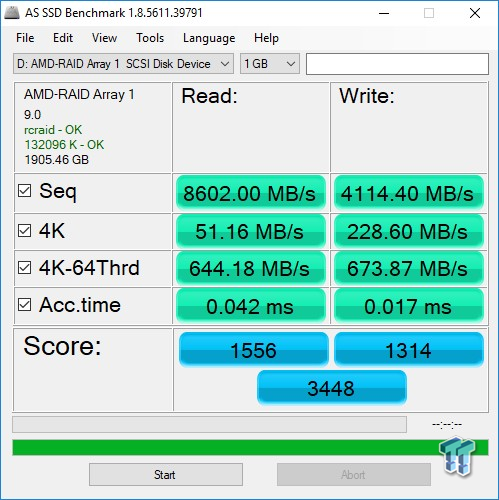
Running AS SSD benchmark produces an unimpressive total score of 3,448. We hit 8.6GB/s sequential read and 4.1GB/s sequential write. If you run RAIDXpert you better hope all you will need is sequential performance, because that is the only thing you are going to get.
Iometer Sequential Read/Write QD32
(No partition on the array)
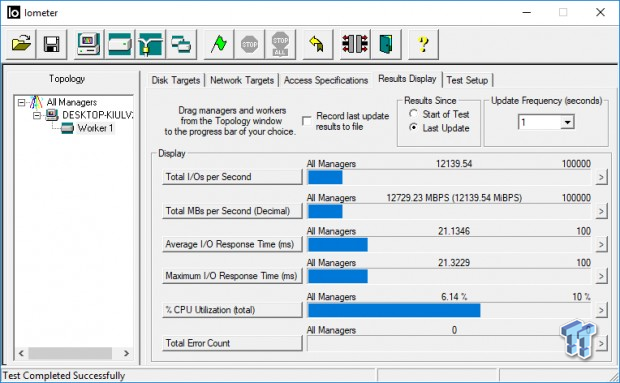
We hit 12.7GB/s sequential read with Iometer.
(No partition on the array)
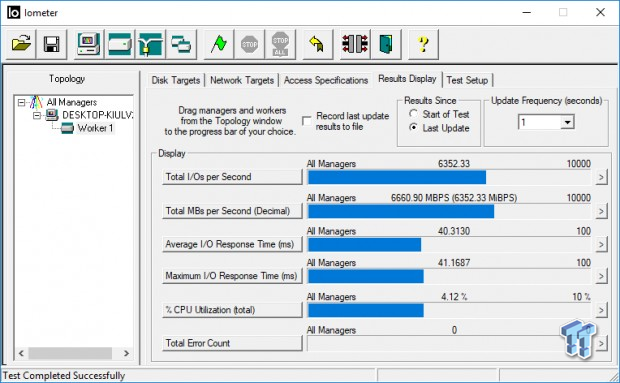
We hit 6.6GB/s sequential write with Iometer.
Fantastic sequential performance for sure. We went ahead and checked out random performance on Iometer with RAIDXpert and it was so bad we didn't even want to show it. It was less than one 760p produces. Overall, RAIDXpert is a total disappointment except for pure sequential, which isn't going to happen very often in a typical user setting. We do love the Threadripper Platform and ASRock's Ultra Quad M.2 Card, just not when running "RAIDXpert".
If you are going to use the Ultra Quad M.2 Card on an AMD X399 platform then we would suggest using MS SoftRAID so you can avoid RAIDXpert altogether. It won't be bootable, but it will deliver far better overall performance.
Final Thoughts
ASRock's Ultra Quad M.2 Card gives us our first look at Direct to CPU RAID. We came away impressed with the card itself and both ASRock motherboards that we used. This comes as no surprise to us as we exclusively use ASRock motherboards for all our consumer and enterprise SSD testing. We use ASRock motherboards because we get the best performance from ASRock as evidenced by our industry leading SSD benchmark results.
We were pleased with the results we got from our Intel VROC arrays via the Ultra Quad M.2 Card. We liked that we could easily create a bootable Direct to CPU array. Not only did we get 12GB/s sequential performance, we also got 1.2 million random 4K IOPS from our 4-drive array via the ASRock Ultra Quad M.2 Card. And that was real RAID not phony JBOD add the individual SSD IOPS together nonsense.
AMD RAIDXpert is another story. RAIDXpert is not a fitting name for AMD's RAID technology because it suggests something good. It does deliver great sequential performance, but that's the only thing it does. We got 1.2 million 4K random IOPS from VROC and only 250K 4K random IOPS from "RAIDXpert" with the exact same SSDs and Ultra Quad M.2 Direct to CPU card.
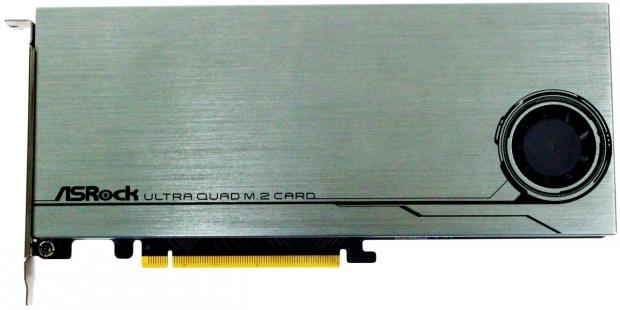
This isn't even platform problem for AMD, X399 can deliver the goods in a big way. The problem is solely that "RAIDXpert" is total crap. What else can you call a four drive RAID 0 array with less random performance than one SSD on its own?
We haven't tested other Quad Card M.2 solutions because we didn't even want to test them. The ASRock Ultra Quad M.2 Card is an exception. The design is unique and looks to us like it will deliver the best performance of any Quad Card on the market because of the short traces it offers.
The ASRock Ultra Quad M.2 Card is cost-effective coming in at just $79.99 for a very high-quality piece of hardware with features no one else offers. We really like the idea of being able to add additional power to the card via its six-pin 12V PCIe power connection. This makes Direct to CPU RAID arrays running power-hungry M.2 and U.2 SSDs with M.2 adapters much more feasible.
We feel that ASRock's Ultra Quad M.2 Card is a best in class piece of hardware and it is TweakTown recommended.
Pros:
- Short Traces
- High Quality Components
- 6-pin 12V Power Connector
Cons:
- None

| Performance | 92% |
| Quality | 99% |
| Features | 95% |
| Value | 98% |
| Overall | 96% |
The Bottom Line: ASRocks Ultra Quad M.2 Card offers a better design and more features than the competition.
PRICING: You can find products similar to this one for sale below.
 United States: Find other tech and computer products like this over at Amazon.com
 United Kingdom: Find other tech and computer products like this over at Amazon.co.uk
 Australia: Find other tech and computer products like this over at Amazon.com.au
 Canada: Find other tech and computer products like this over at Amazon.ca
 Deutschland: Finde andere Technik- und Computerprodukte wie dieses auf Amazon.de
What's in Jon's PC?
- CPU: AMD Ryzen 7800X 3D
- MOTHERBOARD: GIGABYTE AORUS Master X670E
- RAM: Kingston Fury Renegade 7200MHz 32GB
- GPU: ZOTAC AMP Extreme GeForce RTX 4090
- SSD: Crucial T700 2TB Gen5
- OS: Windows 11 Pro
- COOLER: Lian Li Galahad 360 AIO
- CASE: Lian Li Lancool III
- KEYBOARD: Corsair K65 RGB Mini
- MOUSE: SteelSeries AEROX 5 Wireless
- MONITOR: ASUS ROG Strix PG27AQN 360Hz 1440p ULMB2
Similar Content
Related Tags


